Interested in learning ArcPy? check out this course.
I recently had a torrid time trying to research and implement a Python script that could batch convert from PDF to JPG. There are numerous entries online that aim to help (and did so in parts) but I struggled to find one with a concise workflow from start to finish that satisfied my criteria and involved setting up what’s required to implement such. The below could be slated for not being the most ‘Pythonic’ way to get it done but it certainly made my life easier. I was struggling with Wand and ImageMagick as per most posts until I luckily stumbled across an entry on StackOverflow where floqqi, my new hero, answered my prayers. I felt that if I struggled with this that there must be others out there with the same predicament and I hope that the title of this post will help it come to the forefront of searches and aid fellow Python snippet researchers in finding some salvation.
Note: I am using Python 2.7 32-bit on Windows 7 Professional
1. Install ImageMagick
floqqi recommends downloading the latest version, which at the time of writing this is 7.0.4-3. I had already installed an earlier version while trying to get the Wand module to work. My version is 6.9.7-3. If you hover over the links you should be able to see the full link name http://www.imagemagick.org/download/binaries/ImageMagick-6.9.7-3-Q8-x86-dll.exe, or just click that link to download the same version I did.
Run the installer, accept the license agreement, and click Next on the Information window. In the Select Additional Tasks make sure that Install development headers and libraries for C and C++ is selected.

Click Next and then Install.
2. Install GhostScript
Install the 32-bit Ghostscript AGPL Release
3. Set Environment Variables
Create a new System Variable (Advanced System Settings > Environment Variables) called MAGICK_HOME and insert the Image Magick installation path as the value. This will be similar to C:\Program Files (x86)\ImageMagick-6.9.7-Q8
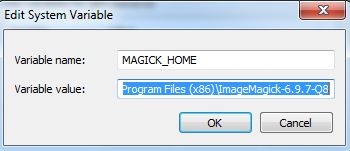
Click OK and and make sure that the same value (C:\Program Files (x86)\ImageMagick-6.9.7-Q8) is at the start of the Path variable. After this entry in the Path variable insert the entry for GhostScript which will be similar to C:\Program Files (x86)\gs\gs9.20\bin
Note: make sure that the entries are separated by a semi-colon (;)
4. Check if steps 1-3 have been correctly configured
Open the Command Prompt and enter…
convert file1.pdf file2.jpg
where file.pdf and file2.jpg are fully qualified paths for an input PDF and and output JPG (or the current directory contains the file).

If no errors are presented and the JPG has been created you can move on to the next step. Otherwise step into some troubleshooting.
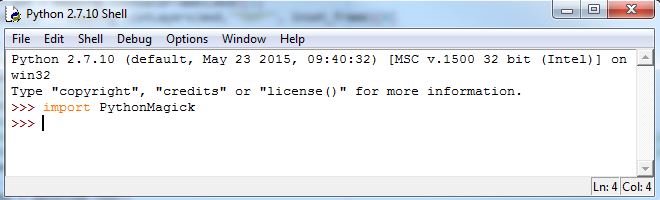
5. Install PythonMagick
I downloaded the Python 2.7 32-bit whl file PythonMagick‑0.9.10‑cp27‑none‑win32.whl and then used pip to install from the command prompt.
pip install C:\Users\glen.bambrick\Downloads\pip install PythonMagick‑0.9.10‑cp27‑none‑win32.whl
Open up a Python IDE and test to see if you can import PythonMagick
We now have everything set up and can begin to write a script that will convert multiple (single page) PDFs to JPGs.
Import the necessary modules.
import os, PythonMagick
from PythonMagick import Image
from datetime import datetime
Ok so datetime isn’t necessary but I like to time my scripts and see if it can be improved upon. Set the start time for the script
start_time = datetime.now()
A couple of global variables, one for the directory that holds the PDFs, and another to hold a hexidecimal value for the background colour ‘white’. After trial and error I noticed that some JPGs were being exported with a black background instead of white and this will be used to force a white background. I found a useful link on StackOverflow to help overcome this.
pdf_dir = r"C:\MyPDFs"
bg_colour = "#ffffff"
We loop through each PDF in the folder
for pdf in [pdf_file for pdf_file in os.listdir(pdf_dir) if pdf_file.endswith(".pdf")]:
Set and read in each PDF. density is the resolution.
    input_pdf = pdf_dir + "\\" + pdf
    img = Image()
    img.density('300')
    img.read(input_pdf)
Get the dimensions of the image.
size = "%sx%s" % (img.columns(), img.rows())
Build the JPG for output. This part must be the Magick in PythonMagic because for a small portion of it I am mystified. See that last link to StackOverflow for the origin of the code here. The PythonMagick documentation is tough to digest and in various threads read the laments about how poor it is.
    output_img = Image(size, bg_colour)
    output_img.type = img.type
    output_img.composite(img, 0, 0, PythonMagick.CompositeOperator.SrcOverCompositeOp)
    output_img.resize(str(img.rows()))
    output_img.magick('JPG')
    output_img.quality(75)
And lastly we write out our JPG
    output_jpg = input_pdf.replace(".pdf", ".jpg")
    output_img.write(output_jpg)
And see how long it took the script to run.
print datetime.now() - start_time
This places the output JPGs in the same folder as the PDFs. Based on the resolution (density) and quality settings the process can be a bit lengthy. Using the settings above it took 9 minutes to do 20 PDF to JPG Conversions. You will need to figure out the optimum resolution and quality for your purpose. Low res took 46 seconds for all 20.
As always I feel a sense of achievement when I get a Python script to work and hope that this post will spur on some comments to make the above process more efficient. Feel free to post links to any resources, maybe comment to help myself and other readers, or if this helped you in anyway let me know and I’ll pass the thanks on to floqqi and the rest of the crew. This script is the limit of my knowledge with PythonMagick and this is thanks to those that have endeavoured before me and referenced in the links throughout this post. Thanks guys.
Complete script…
import os, PythonMagick
from PythonMagick import Image
from datetime import datetime

start_time = datetime.now()

pdf_dir = r"C:\MyPDFs"
bg_colour = "#ffffff"

for pdf in [pdf_file for pdf_file in os.listdir(pdf_dir) if pdf_file.endswith(".pdf")]:

    input_pdf = pdf_dir + "\\" + pdf
    img = Image()
    img.density('300')
    img.read(input_pdf)

    size = "%sx%s" % (img.columns(), img.rows())

    output_img = Image(size, bg_colour)
    output_img.type = img.type
    output_img.composite(img, 0, 0, PythonMagick.CompositeOperator.SrcOverCompositeOp)
    output_img.resize(str(img.rows()))
    output_img.magick('JPG')
    output_img.quality(75)


    output_jpg = input_pdf.replace(".pdf", ".jpg")
    output_img.write(output_jpg)

print datetime.now() - start_time
