Interested in learning ArcPy? check out this course.
I recently had a torrid time trying to research and implement a Python script that could batch convert from PDF to JPG. There are numerous entries online that aim to help (and did so in parts) but I struggled to find one with a concise workflow from start to finish that satisfied my criteria and involved setting up what’s required to implement such. The below could be slated for not being the most ‘Pythonic’ way to get it done but it certainly made my life easier. I was struggling with Wand and ImageMagick as per most posts until I luckily stumbled across an entry on StackOverflow where floqqi, my new hero, answered my prayers. I felt that if I struggled with this that there must be others out there with the same predicament and I hope that the title of this post will help it come to the forefront of searches and aid fellow Python snippet researchers in finding some salvation.
Note: I am using Python 2.7 32-bit on Windows 7 Professional
1. Install ImageMagick
floqqi recommends downloading the latest version, which at the time of writing this is 7.0.4-3. I had already installed an earlier version while trying to get the Wand module to work. My version is 6.9.7-3. If you hover over the links you should be able to see the full link name http://www.imagemagick.org/download/binaries/ImageMagick-6.9.7-3-Q8-x86-dll.exe, or just click that link to download the same version I did.
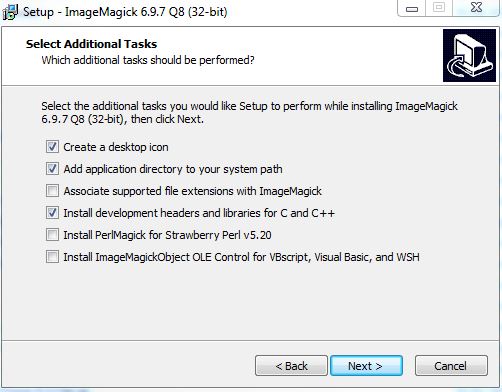
Run the installer, accept the license agreement, and click Next on the Information window. In the Select Additional Tasks make sure that Install development headers and libraries for C and C++ is selected.
Click Next and then Install.
2. Install GhostScript
Install the 32-bit Ghostscript AGPL Release
3. Set Environment Variables
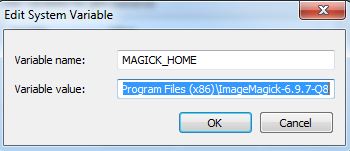
Create a new System Variable (Advanced System Settings > Environment Variables) called MAGICK_HOME and insert the Image Magick installation path as the value. This will be similar to C:\Program Files (x86)\ImageMagick-6.9.7-Q8
Click OK and and make sure that the same value (C:\Program Files (x86)\ImageMagick-6.9.7-Q8) is at the start of the Path variable. After this entry in the Path variable insert the entry for GhostScript which will be similar to C:\Program Files (x86)\gs\gs9.20\bin
Note: make sure that the entries are separated by a semi-colon (;)
4. Check if steps 1-3 have been correctly configured
Open the Command Prompt and enter…
convert file1.pdf file2.jpg
where file.pdf and file2.jpg are fully qualified paths for an input PDF and and output JPG (or the current directory contains the file).
If no errors are presented and the JPG has been created you can move on to the next step. Otherwise step into some troubleshooting.
5. Install PythonMagick
I downloaded the Python 2.7 32-bit whl file PythonMagick‑0.9.10‑cp27‑none‑win32.whl and then used pip to install from the command prompt.
pip install C:\Users\glen.bambrick\Downloads\pip install PythonMagick‑0.9.10‑cp27‑none‑win32.whl
Open up a Python IDE and test to see if you can import PythonMagick
We now have everything set up and can begin to write a script that will convert multiple (single page) PDFs to JPGs.
Import the necessary modules.
import os, PythonMagick
from PythonMagick import Image
from datetime import datetime
Ok so datetime isn’t necessary but I like to time my scripts and see if it can be improved upon. Set the start time for the script
start_time = datetime.now()
A couple of global variables, one for the directory that holds the PDFs, and another to hold a hexidecimal value for the background colour ‘white’. After trial and error I noticed that some JPGs were being exported with a black background instead of white and this will be used to force a white background. I found a useful link on StackOverflow to help overcome this.
pdf_dir = r"C:\MyPDFs"
bg_colour = "#ffffff"
We loop through each PDF in the folder
for pdf in [pdf_file for pdf_file in os.listdir(pdf_dir) if pdf_file.endswith(".pdf")]:
Set and read in each PDF. density is the resolution.
    input_pdf = pdf_dir + "\\" + pdf
    img = Image()
    img.density('300')
    img.read(input_pdf)
Get the dimensions of the image.
size = "%sx%s" % (img.columns(), img.rows())
Build the JPG for output. This part must be the Magick in PythonMagic because for a small portion of it I am mystified. See that last link to StackOverflow for the origin of the code here. The PythonMagick documentation is tough to digest and in various threads read the laments about how poor it is.
    output_img = Image(size, bg_colour)
    output_img.type = img.type
    output_img.composite(img, 0, 0, PythonMagick.CompositeOperator.SrcOverCompositeOp)
    output_img.resize(str(img.rows()))
    output_img.magick('JPG')
    output_img.quality(75)
And lastly we write out our JPG
    output_jpg = input_pdf.replace(".pdf", ".jpg")
    output_img.write(output_jpg)
And see how long it took the script to run.
print datetime.now() - start_time
This places the output JPGs in the same folder as the PDFs. Based on the resolution (density) and quality settings the process can be a bit lengthy. Using the settings above it took 9 minutes to do 20 PDF to JPG Conversions. You will need to figure out the optimum resolution and quality for your purpose. Low res took 46 seconds for all 20.
As always I feel a sense of achievement when I get a Python script to work and hope that this post will spur on some comments to make the above process more efficient. Feel free to post links to any resources, maybe comment to help myself and other readers, or if this helped you in anyway let me know and I’ll pass the thanks on to floqqi and the rest of the crew. This script is the limit of my knowledge with PythonMagick and this is thanks to those that have endeavoured before me and referenced in the links throughout this post. Thanks guys.
Complete script…
import os, PythonMagick
from PythonMagick import Image
from datetime import datetime

start_time = datetime.now()

pdf_dir = r"C:\MyPDFs"
bg_colour = "#ffffff"

for pdf in [pdf_file for pdf_file in os.listdir(pdf_dir) if pdf_file.endswith(".pdf")]:

    input_pdf = pdf_dir + "\\" + pdf
    img = Image()
    img.density('300')
    img.read(input_pdf)

    size = "%sx%s" % (img.columns(), img.rows())

    output_img = Image(size, bg_colour)
    output_img.type = img.type
    output_img.composite(img, 0, 0, PythonMagick.CompositeOperator.SrcOverCompositeOp)
    output_img.resize(str(img.rows()))
    output_img.magick('JPG')
    output_img.quality(75)


    output_jpg = input_pdf.replace(".pdf", ".jpg")
    output_img.write(output_jpg)

print datetime.now() - start_time


Thanks for posting, this is helpful. I’m dealing with a name collision issue with ‘convert’ at step 4. How were you able to avoid this? I tried listing the absolute path to the convert.h file before the convert call, but the header file type wasn’t recognized. -Carleton
LikeLike
I didn’t encounter any problems here. Have you tried uninstalling Steps 1 and 2 and starting over? Just to make sure you haven’t missed out on anything
LikeLike
Perhaps an update occurred since your original post. Using the command ‘magick’ instead of ‘convert’ did the trick. Thanks for the reply. This is the problem I’m referring to:
http://stackoverflow.com/questions/3060205/error-invalid-parameter-fom-imagemagick-convert-on-windows
LikeLike
Excellent! Thanks for the update and link
LikeLike
Thanks for the post. I tried the python code but it is giving me the following error
Traceback (most recent call last):
File “C:/Users/XXXXX/PycharmProjects/untitled/p2i.py”, line 16, in
img.read(input_pdf)
RuntimeError: Magick: UnableToOpenConfigureFile `delegates.xml’ @ warning/configure.c/GetConfigureOptions/712
Am able to use the convert command line utility to do the convert without issues.
LikeLike
The configuration files are usually at C:\Program Files (x86)\ImageMagick-6.9.7-Q8 (for my instance), check that delegates.xml is in here.
If you search the error here https://www.imagemagick.org/script/search.php
you might get some answers.
I originally went through the process in this post a couple of times with ImageMagick downloads, completely uninstalling the failed attempts until I got one to work. I’ve used it a lot of times since so it was worth it.
LikeLike
Thanks for the quick response
My delegates xml file is in C:\Program Files\ImageMagick-7.0.5-Q16.
The convert program works well from command line. I tried -debug configuration option and it showed me that it is checking in the above directory for delegates.xml. Not sure why Python code is having an issue. Any way to debug the python process?
LikeLike
Just noticed that the following code works perfectly
img = Image(input_pdf)
Only when I do this am getting error. I actually need to set the density as the default density is too poor to do anything with.
img = Image()
img.density(‘600’)
img.read(input_pdf)
Is there a way I can change the default density being used? This would help me to use Image(input_pdf) and still get my expected result.
LikeLike
Try this…
img = Image(input_pdf)
img.density(‘300’)
remove…
img.read(input_pdf)
LikeLike
Thank you for your script. I will try this the next hours. I want to write a pdf -> txt script. All i found were not working, so i have to write it by my own
LikeLiked by 1 person
Yes! thanks dude. I’m using python 3.6 via Anaconda/Spyder 64 bit on Windows 7 and after banging my head against the wall for 48 hours with various combos of Wand, ImageMagick and GS this finally worked! My working version uses ImageMagick-6.9.8-9 for 64 bit, which I had to search for a while to find since they only offer version 7+ on the official site. I did this originally because forums told me that Wand wasn’t ready for version 7 yet, so newer versions may also work. And then for PythonMagick I used the most recent version for python 3.6/64 bit. Your post was a godsend. Thanks for taking the time to share!
LikeLiked by 1 person
can u plzz tell me what was your GS version…?
LikeLike
I am from Ecuador help me with the code please do not work with the files that I download
LikeLike
this is my mail : maur1025@hotmail.com
LikeLike
Thank you very much posting the script. Really helpful. You save my day
LikeLiked by 1 person
Thank you so much for posting this. It worked perfectly.
LikeLiked by 1 person
Thank you very much for this post. Works beautifully for first page, but the remaining pages from pdf are missing. Can you please help?
LikeLiked by 1 person
You would need to iterate through each page and export each one to JPG. Look at using PyPDF2 to access each page. Some of the code at https://glenbambrick.com/2016/09/23/extract-rename-pdf-pages/ might help and you will find plenty of help with a Google search. Cheers
LikeLike
Hi,
Thank you for this!
I followed all the steps and everything seems to be fine except when I run it I get this error:
Traceback (most recent call last):
File “.\pdf_to_img_conv2.py”, line 17, in
img.density(‘300’)
Boost.Python.ArgumentError: Python argument types in
Image.density(Image, str)
did not match C++ signature:
density(class Magick::Image {lvalue})
density(class Magick::Image {lvalue}, class Magick::Point)
Any thoughts what could be going wrong?
Thank you!
-DJ
LikeLike
DJ, you got this issue resolved? I am getting similar for img.density(‘300’).
LikeLike
did you guys find i fix i got the same error
LikeLike
How to do in Linux
LikeLike
what is the difference of using wnad and magick
LikeLike
Don’t know what I did wrong. when I run the cmd the pdf file dont get converted and I get an error.
LikeLike
This script does NOT work. Aside from PythonMagick being a giant pain, the code here has problems, and I know I am just scratching the surface. Just start with the image density setting. It takes 2 arguments, so unless this code was executed against an older version of PythonMagic AND the image density signature was change to require 2 parameters, then there is no way this code could have been executed successfully as-is, much less be successful at converting PDF’s to images in PPT.
img.density(‘600’)
Boost.Python.ArgumentError: Python argument types in
Image.density(Image, str)
did not match C++ signature:
density(class Magick::Image {lvalue})
density(class Magick::Image {lvalue}, class Magick::Point)
It is frustrating, as I have an urgent need to convert some PDF data over to PPT, and since it was urgent, I was looking for a quick solution. However, it appears that is not possible, and will have to create a working solution from scratch, using any myriad combination of some of the most problematic modules for Python, such as PythonMagick, PyPP2, Wand, and others.
LikeLike